Before going into the walkthrough, note that Going Rogue will get unlocked after you successfully complete The Family Jewel Mission.
In the Going Rogue Borderlands 3, you will find yourself on Eden-6 planet, and the area will be Floodmoor Basin. You will get Clay in the Quest Giver, and the requirement is to successfully complete the Family Jewel mission. We recommend you achieve level 26. And after completing the mission, you will be rewarded with a cash price of 8053$, along with a 20904 XP and Traitor’s Death unique weapon, also known as Epic Assault Rife.
In this article, we will take you through the objectives of the Going Rogue in Borderlands 3.
Going Rogue Borderlands 3 Mission Brief
Clay will be already found in the following fragment of the Vault Key. But unfortunately, the bad news is that he will be tied with the contract for working with other smuggling teams, and now he is not able to get a grip on them. But you have to search them out if you wish that piece.
Going Rogue Borderlands 3 Mission Guide
Talking to Clay
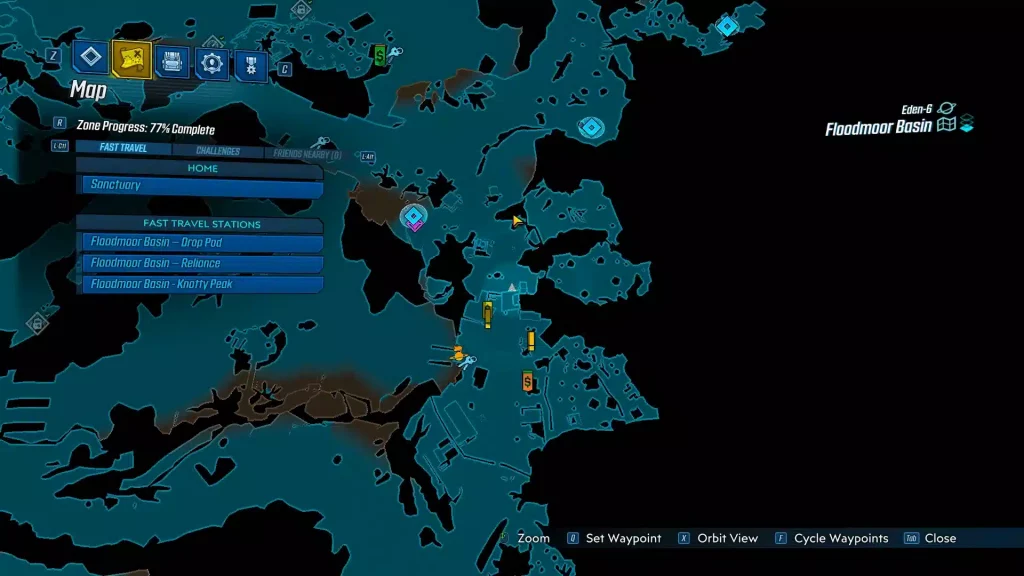
You have to travel swiftly towards the Eden-6 towards the Floodmoor Basin and reach the Reliance Travel Point. After getting to this point, then you must travel and have a word with Clay.
Taking Rouge – Sight
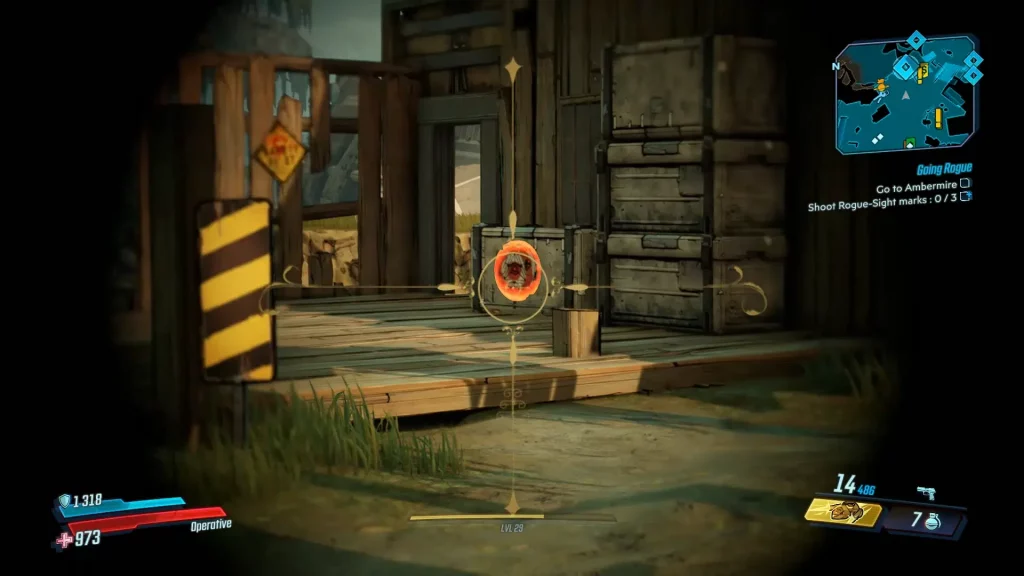
Clay has delivered a group which he has utilized to run for collecting the Vault Key Piece. But unfortunately, now he is lost the communication with them, and you are assigned the role to search them once again. He will offer you a gun and now collect the gun.
Shoot Rouge Sight Marks: 0/3 (Optional)
While having the conversation, Clay will explain to you about the gun he has utilized to leave the message and hide the items and everything. You have to consider it a golden opportunity and shoot the three hidden targets to get some additional loot.
One is placed over near the fast travel station for the first target and looks towards your East. You will get a target one is available on the crate. Now, you must shoot the target and reveal the rewards from the chest.
The two targets are also found at the Eastern side towards the end of the town. One target you will see is near the cliff towards the Jobs restaurant building. Now you have to look towards the North where two damaged cars are kept. Now zoom in on the crate, and you will a target between them.
You will find the third target in the southeast direction. Move towards the Shack, which is located close to the dam waterfall. Next, you have to see the crate, which is located directly behind it.
Move to Ambermire
Now you have successfully collected all the additional loot, and you must move further towards the South towards the fundamental objective.
Shoot Rogue – Sight Marks: 0/3
It is a similar process as we have followed before you have to aim the gun and look towards the Rogue-Sight Marks for opening the door. You will find all three targets together on the wall.
Move to Ambermire
The next step for you is to move forward towards the new location Ambermire.
Move towards the Rogue’s Base
You should move towards the marked location area, which will take out any indigenous life, or towards the bandits, you will meet on your path. When you get closer towards the base entrance, you will likely run into the second Badass Jabber, which you have to face and deal it.
Shoot the Rogue – Sight Mark
You will find the Shoot the Rogue – Sight Mark directly towards the right direction of the door, which is available on the root.
Search Archimedes
You have to walk into the newly opened door towards the Rogue’s base (Going Rogue Borderlands 3).
Opening the Base Door
You have to have a communication with the door and just pass the fast travel point for opening it.
Turn On the Emergency Power
You have to hit on the switch located on the left side of the console for switching on the power.
Search Archimedes: 0/4
Move around the room and have a communication with all the four bodies for examining them.
Finding Archimedes
Finally, go and interact with the short-shaped body located in the middle of the room.
Collect Archimedes ID
Collect the ID Device found near the body.
Activate the Security Console
Move towards the other section of the table and interact with the keyboard and see the security footage.
Activating the Loot Tracker
Move towards the other section of the table and interact with the second keyboard to switch on the loot tracker.
Search Agent Dee
Clay will ask you to move around the area and search his remaining agents so you can get the IDs. Move towards the marked location to get the first one.
Shoot Dee’s Rogue-Sight Mark
Dee is one of the characters who is distracting the bandits in the middle of the rig area. Shoot the Rogue-Sight Mark located at the shed behind and destroy the cover.
Securing Agent Dee
Dee will purposely get blasted, and you have to take out all the bandits from the area.
Collect Dee’s ID
When all the enemies are gone, move towards the speaker and collect the ID.
Check Dead Drop
Move forward and check the marked dead drop and view the next agent.
Shoot Rogue-Sight Mark
Kill the mark found on the side of the Mailbox. Next, have a word with one which is displayed on the screen for collecting the dead dop.
Checking the Dead Drop
Move towards the second marked location and search for the following Dead drop.
Shoot Rogue – Sight Mark
Once again, shoot at the side of the Mailbox, disclosing the second Mailbox and another dead drop to collect.
Finding Agent Quietfoot
You have to move towards the Southern direction towards the marked location and search for Agent Quietfoot.
Realizing Cage
You will see Quiet foot is locked inside a cage hanging in the air. Your role is to pull the lever and get him out.
Takedown Mud Neck Clan
The quiet foot will die from the trap available in the cage. You have to get all the bandits who are now coming into the location, take them all and move further. Move back towards the cage and collect the Quietfoot’s ID.
Move towards Dock
You have to move towards the Dock location to seeing the last Rogue members.
Securing Docks
Once you move close, Domino will call you and will inform you that he is in a safe location. He can take your help to destroy all the COV enemies located in the area of the dock. Move there and clear the site. When you remove the first group further, more enemies will spawn from the dropship.
Move the Ship Scanner into Place
Domino will also deliver a message that he is utilizing a scanner for tracking the dropships, and he wants you to move the crane into the position for the Scanner to work. Now, you have to climb up the building towards the side and then climb up the ladder, reach the top around the edge, and activate the console available on the other side.
Getting towards Ship Scanner
You must climb up the ladder in front of you, move across the crane’s arm, and drop down to the end of the crane to get to a scanner.
Smacking Down the Broken Rogue-Sight Mark. Once you reach the top of the Scanner, melee the market section for activating the Rouge-Sight Mark.
Defending the Scanner while it charges
The second wave of enemies will spawn in, jump down and destroy the enemies in the location while you wait for the Scanner to get charged up.
Checking Domino’s Office
Move towards the marked area and see for the Domino’s ID.
Collect Domino’s ID and return to Rogue’s Base.
As you have all the IDs, you must get back to the base. You will reach there swiftly by using Ambermire-Rogue’s Hollow, a fast travel location.
Scan IDs
Keep the IDs on the marked location neat on the computer.
Activate the Loot Tracker
Now you are capable of activating the Loot Tracker properly by talking with the keyboard.
Follow the Loot Tracker
When the loot tracker is a digitized Jabber, it will update into a Loot Tracker. Take it to its destination and destroy all the enemies.
Take the Elevator
After reaching towards the dead-end ride on the elevator and take it up, if you activate the elevator when you are not on it, it will leave without you, and you can call it back by using the button available on the wall.
Find Key Fragment
Move inside the building and collect the ammo you require from the vending machine. Later moving into the following zone.
Defeat Archimedes
Turn out the Archimedes which was purple in the entire journey. He is like a hallow enemy, so it means he is small and moves around swiftly. He will cover the location, their size will slightly increase, and he will start shooting towards you using a gun.
He will also run towards you and will try to punch you. He can also be tiny and run around to avoid you. The fight is not similar as previous Anointed were there. You have to just keep the ammo on him until you kill him.
Collect Vault Key Fragment
He will get changed into the crystal and get exploded by itself at a point when you are capable of grabbing the vault key fragment over the ground.
Go to Sanctuary
Swiftly travel yourself back to the Sanctuary if you complete the area.
Give Vault Key Fragment to Tannis
Move towards Tannis lab to provide her the fragment and complete the mission.
Other Borderlands Guides
All Borderlands 3 Red Chests Locations
Borderlands 3 Homeopathological Guide