Roblox has allowed developing games on our own. This unique kind of freedom attracted many developers all around the world to create games on Roblox. Because not only Roblox has a huge player base, but also you can earn Robux using your game. There are many tutorials available on the developer section of the Roblox website. Some of the tutorials are really good, whereas some tutorials have complicated explanations.
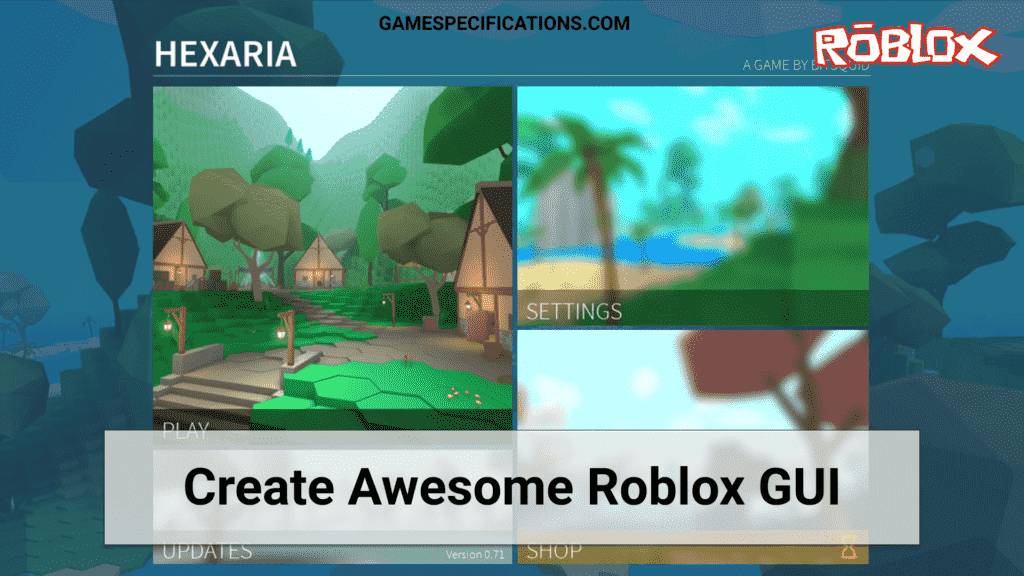
Roblox GUI is a tool/utility to create a GUI for your Roblox game. As GUI stands for Graphical User Interface, you might already have a little idealogy on various GUIs in the Roblox game. A good GUI can drastically improve the conversion rate of players actually playing the game. A GUI is considered bad if the user cannot understand the working and navigational flow within seconds.
You can create complex GUIs as well as a basic GUI that every Roblox game has. The only reason why Roblox has allowed creating GUI is that you can work around the different elements and create a good user-friendly UIs for your end-users.
Where can we use Roblox GUI?
Roblox GUI can be used as the main home screen of your game or display various player’s attributes such as health, level, money, and XP. This various use of GUI allows understanding the game easily. The main feature of GUI is to provide a clickable item or display some info of character playing the game. It can also be used to create buttons on the play screen.
How to use Roblox GUI?
GUI is a tool available on Roblox Studios. This tool creates a 2D sheet to place keys and sprites on them. The ability to stick to the screen even if the player moves makes Roblox GUI unique. There is no game released without any GUI or HUD. They fill the gap between in-game characters and the players. Many games have subtitles in their story. These subtitles are also a part of the GUI.
Now, the main question arises. How do I use this Roblox GUI? The answer to this question is in your Roblox Studio itself. Roblox Studios have provided all sets of tools to use the GUI service in your game. It also contains tools to control the Roblox Humanoids.
While making a game in Roblox, you can add a GUI to your vanilla project by doing the following steps –
1. Click on the StarterGui option from the Explorer tab. This tab is located on the left side of your window.
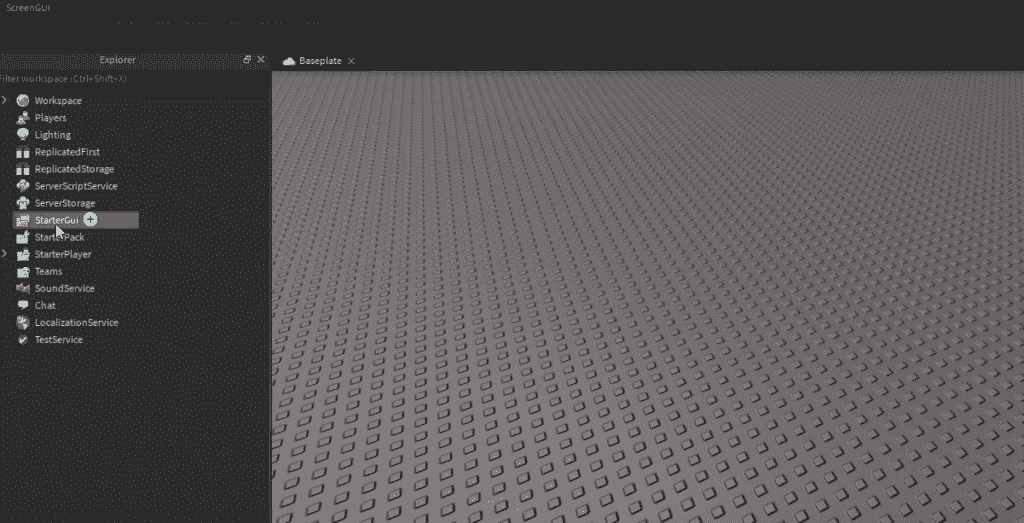
2. Now on the top left side of your screen, there is an option of ScreenGui. Click on this to create an object inside of StarterGUI. This object will instantiate the 2D GUI frame into your game.

You can use the options from the top bar to create a GUI accordingly.
Three Types of Roblox GUI
In Roblox, there are three types of Roblox GUIs available to choose from. Each of these GUI work differently and can be used to improve your user interaction.
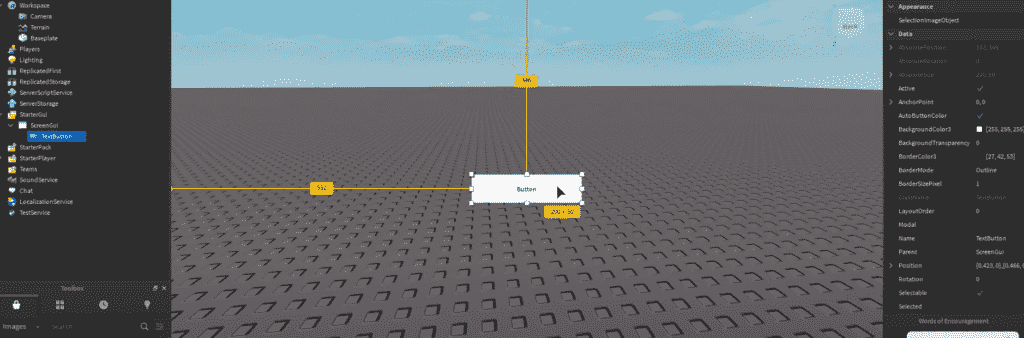
Screen GUI
Screen GUI is a 2D object that is placed in front of your 3D screen. This type of GUI is used to create game menus and HUD while playing the game. You can create as many screen GUIs to create a good user experience.
Billboard GUI
Billboard GUI is a type of GUI attached to a character/object reference. The perfect example of this type of GUI is the name tag. Name tags are GUIs attached to the characters playing the game. There is an option to hide this GUI if your distance from the object becomes more than the desired value. This is extremely useful while displaying the information of nearby players only.
Surface GUI
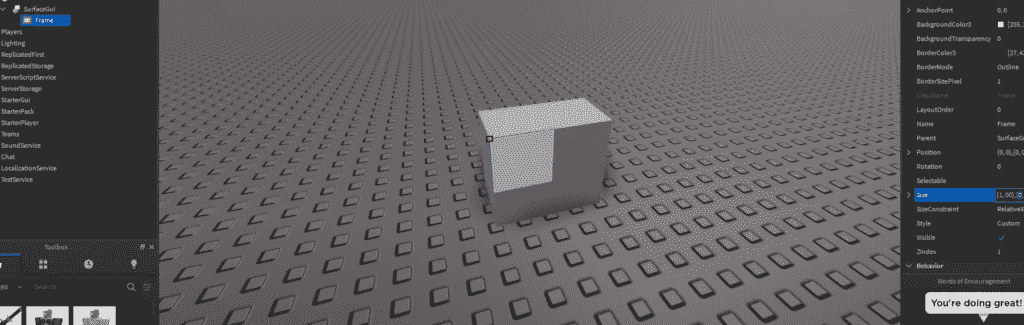
Surface GUI is a GUI attached to a certain surface. Unlike billboard GUI, this GUI is fixed on the surface of any screen. This is useful to create nameplates of your house, etc. You can apply the desired text on top of it to make it look like a text plate.
Add Text Label Over Roblox GUI
GUIs can have multiple purposes. But almost every GUI has at least one text object. This text object is used to name the item. In Roblox Studios, you can easily create a text label over Roblox GUI to add a text.
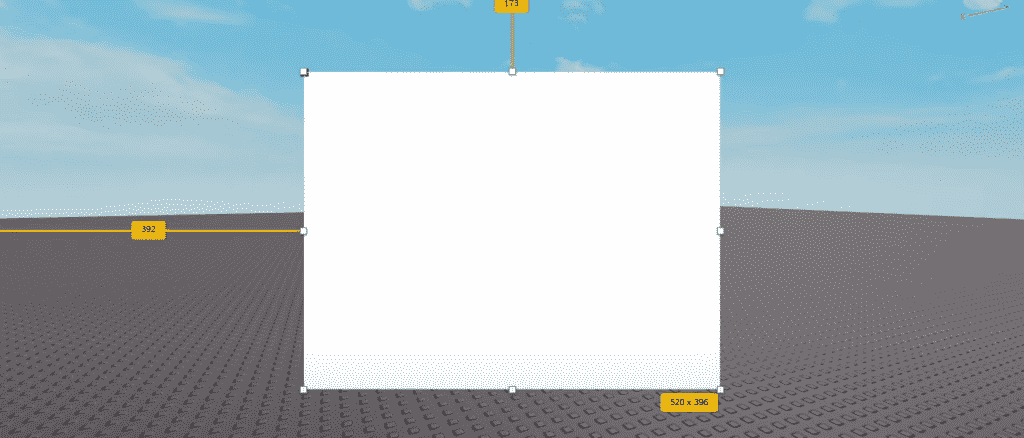
1. Select the + icon on the right side of Screen GUI. This will open up a list of options and attributes you can use in this GUI.
2. Now, select the TextLabel from the list and start editing. This will create a new object of TextLabel and attach it to the Screen GUI automatically.
3. To change the text inside this TextLabel, click on the properties option from the top bar (This option is only visible after you select TextLabel).
4. There are options to change the Font, Font Size, and Text itself. Try out some other options, to find some interesting things about this TextLabel.
Moreover, GUI is not just a bunch of text labels but you have to add some functionality to them. To add a script to any button, you have to do the following steps –
1. Click on the Insert option of TextLabel. Now, there are multiple things you can insert in any TextLabels.
2. Select the “Object” option and select “Script.” This will open up a tab asking for the script to be applied to this object. In this box, you can place your Lua script to achieve a specific task or just navigate between your screens.
How to add an Image in Roblox GUI
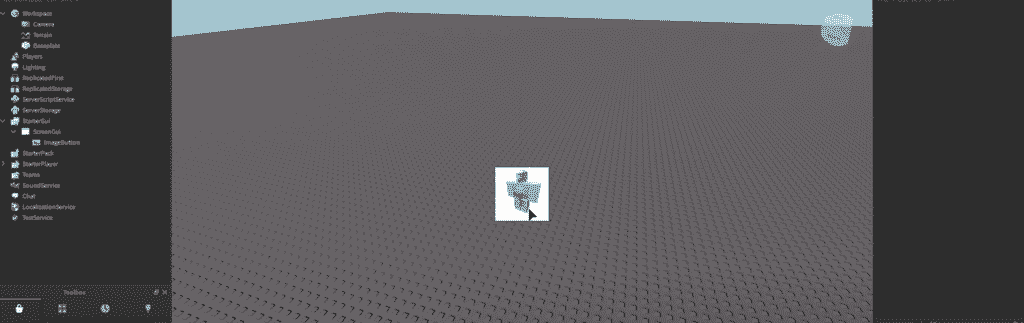
Just like TextLabel, there is another option called “ImageLabel” which is used to add images in your Roblox GUI box. You can use this label to add a custom image of your requirement in the game.
Properties of Roblox GUI
Roblox GUI is an object programmed in Lua. As any other object has attributes and properties, the GUI object also has some properties which can be accessed from the scripts. Following are the properties of GUIs –
- AbsolutePosition: This property returns a vector value of the position of your GUI. This will also count the offset values if used.
- AbsoluteSize: This returns a vector value of the size of the GUI. The 2D Vector only contains the details about the width and height of the GUI.
- Active: Returns whiter the GUI is active or not.
- BackgroundColor3: YOu can change the background color by using this property. The three values you need to provide are the color values of RGB.
- BackgroundTransparency: This edits the background color’s opacity.
- BorderColor3: Changes the border color to your desired RB color.
- BorderSizePixel: Changes the thickness of your border.
- Name: Change the name of your GUI object.
- Parent: Returns an object of Parent.
- Position: This can be used to change the position of the GUI.
- Size: To change the size of the GUI.
- SizeConstraint: Direction to be allowed to resize.
- Visible: Returns a bool value of GUI’s visibility.
- ZIndex: ZIndex can be used to order the GUI above each other.
- className: Returns a class value of GUI.
- AutoButtonColor: Change the color of the button when clicked.
- Image: Get the image of the button.
Roblox GUI Scripts
There are multiple ways to embed a Lua script in your game. These scripts can create certain advantages over your enemies (Can be considered hacking). Game Specifications do not promote any of the hacking Scripts, and these scripts can eventually lead to a ban. An example of such a script in Roblox is –
-- Instances of your objects:
local FirstScript = Instance.new("ScreenGui")
local main = Instance.new("Frame")
local Title = Instance.new("TextLabel")
local Gravity = Instance.new("TextButton")
local Close = Instance.new("TextButton")
local WalkSpeed = Instance.new("TextButton")
local PaintBall = Instance.new("TextButton")
local Fly = Instance.new("TextButton")
local Openmain = Instance.new("Frame")
local Open = Instance.new("TextButton")

--Properties of those instances:
FirstScript.Name = "FirstScript"
FirstScript.Parent = game.Players.LocalPlayer:WaitForChild("PlayerGui")
FirstScript.ZIndexBehavior = Enum.ZIndexBehavior.Sibling

main.Name = "main"
main.Parent = FirstScript
main.BackgroundColor3 = Color3.fromRGB(255, 0, 0)
main.Position = UDim2.new(0.24222587, 0, 0.460580945, 0)
main.Size = UDim2.new(0, 509, 0, 284)
main.Visible = false

Title.Name = "Title"
Title.Parent = main
Title.BackgroundColor3 = Color3.fromRGB(251, 255, 0)
Title.Size = UDim2.new(0, 509, 0, 50)
Title.Font = Enum.Font.GothamBold
Title.Text = "JailHaxx"
Title.TextColor3 = Color3.fromRGB(0, 0, 0)
Title.TextScaled = true
Title.TextSize = 14.000
Title.TextWrapped = true

Gravity.Name = "Gravity"
Gravity.Parent = main
Gravity.BackgroundColor3 = Color3.fromRGB(255, 255, 0)
Gravity.Position = UDim2.new(0.0137524558, 0, 0.254409373, 0)
Gravity.Size = UDim2.new(0, 200, 0, 50)
Gravity.Font = Enum.Font.GothamBold
Gravity.Text = "Gravity"
Gravity.TextColor3 = Color3.fromRGB(0, 0, 0)
Gravity.TextScaled = true
Gravity.TextSize = 14.000
Gravity.TextWrapped = true

Close.Name = "Close"
Close.Parent = main
Close.BackgroundColor3 = Color3.fromRGB(255, 0, 0)
Close.Position = UDim2.new(0.903732836, 0, 0, 0)
Close.Size = UDim2.new(0, 49, 0, 41)
Close.Font = Enum.Font.GothamBold
Close.Text = "X"
Close.TextColor3 = Color3.fromRGB(0, 0, 0)
Close.TextScaled = true
Close.TextSize = 14.000
Close.TextWrapped = true

WalkSpeed.Name = "WalkSpeed"
WalkSpeed.Parent = main
WalkSpeed.BackgroundColor3 = Color3.fromRGB(255, 255, 0)
WalkSpeed.Position = UDim2.new(0.53634578, 0, 0.254409373, 0)
WalkSpeed.Size = UDim2.new(0, 200, 0, 50)
WalkSpeed.Font = Enum.Font.GothamBold
WalkSpeed.Text = "WalkSpeed"
WalkSpeed.TextColor3 = Color3.fromRGB(0, 0, 0)
WalkSpeed.TextScaled = true
WalkSpeed.TextSize = 14.000
WalkSpeed.TextWrapped = true

PaintBall.Name = "PaintBall"
PaintBall.Parent = main
PaintBall.BackgroundColor3 = Color3.fromRGB(255, 255, 0)
PaintBall.Position = UDim2.new(0.53634578, 0, 0.606522083, 0)
PaintBall.Size = UDim2.new(0, 200, 0, 50)
PaintBall.Font = Enum.Font.GothamBold
PaintBall.Text = "PaintBall"
PaintBall.TextColor3 = Color3.fromRGB(0, 0, 0)
PaintBall.TextScaled = true
PaintBall.TextSize = 14.000
PaintBall.TextWrapped = true

Fly.Name = "Fly"
Fly.Parent = main
Fly.BackgroundColor3 = Color3.fromRGB(255, 255, 0)
Fly.Position = UDim2.new(0.0137524605, 0, 0.606522083, 0)
Fly.Size = UDim2.new(0, 200, 0, 50)
Fly.Font = Enum.Font.GothamBold
Fly.Text = "Fly"
Fly.TextColor3 = Color3.fromRGB(0, 0, 0)
Fly.TextScaled = true
Fly.TextSize = 14.000
Fly.TextWrapped = true

Openmain.Name = "Openmain"
Openmain.Parent = FirstScript
Openmain.BackgroundColor3 = Color3.fromRGB(255, 0, 0)
Openmain.Position = UDim2.new(0, 0, 0.54080224, 0)
Openmain.Size = UDim2.new(0, 133, 0, 48)

Open.Name = "Open"
Open.Parent = Openmain
Open.BackgroundColor3 = Color3.fromRGB(255, 0, 0)
Open.Position = UDim2.new(-0.00363767147, 0, -0.00394366682, 0)
Open.Size = UDim2.new(0, 133, 0, 48)
Open.Font = Enum.Font.GothamBold
Open.Text = "Open"
Open.TextColor3 = Color3.fromRGB(0, 0, 0)
Open.TextScaled = true
Open.TextSize = 14.000
Open.TextWrapped = true

-- Scripts functionalities:

local function a()local b=Instance.new('LocalScript',Gravity)b.Parent.MouseButton1Click:Connect(function()game.Workspace.Gravity=50 end)end

coroutine.wrap(GSGRAVITY_fake_script)()local function a()local b=Instance.new('LocalScript',Close)b.Parent.MouseButton1Click:Connect(function()b.Parent.Parent.Visible=false end)end

coroutine.wrap(GSCLOSE_fake_script)()local function a()local b=Instance.new('LocalScript',WalkSpeed)b.Parent.MouseButton1Click:Connect(function()game.Players.LocalPlayer.Character.Humanoid.WalkSpeed=50 end)end

coroutine.wrap(GSWALKSPEED_fake_script)()local function a()local b=Instance.new('LocalScript',PaintBall)b.Parent.MouseButton1Click:Connect(function()while wait(0.5)do local c=workspace:getDescendants()for d=1,#c do if c[d].Name=="Hitbox"then if c[d].Parent.Name~=game.Players.LocalPlayer.Name then c[d].Massless=true;c[d].Size=Vector3.new(100,100,100)c[d].Transparency=0.5 end end end end end)end;coroutine.wrap(a)()


local function a()local b=Instance.new('LocalScript',Fly)b.Parent.MouseButton1Click:Connect(function()repeat wait()until game.Players.LocalPlayer and game.Players.LocalPlayer.Character and game.Players.LocalPlayer.Character:findFirstChild("Torso")and game.Players.LocalPlayer.Character:findFirstChild("Humanoid")local c=game.Players.LocalPlayer:GetMouse()repeat wait()until c;local d=game.Players.LocalPlayer;local e=d.Character.Torso;local f=true;local g=true;local h={f=0,b=0,l=0,r=0}local i={f=0,b=0,l=0,r=0}local j=50;local k=0;function Fly()local l=Instance.new("BodyGyro",e)l.P=9e4;l.maxTorque=Vector3.new(9e9,9e9,9e9)l.cframe=e.CFrame;local m=Instance.new("BodyVelocity",e)m.velocity=Vector3.new(0,0.1,0)m.maxForce=Vector3.new(9e9,9e9,9e9)repeat wait()d.Character.Humanoid.PlatformStand=true;if h.l+h.r~=0 or h.f+h.b~=0 then k=k+.5+k/j;if k>j then k=j end elseif not(h.l+h.r~=0 or h.f+h.b~=0)and k~=0 then k=k-1;if k<0 then k=0 end end;if h.l+h.r~=0 or h.f+h.b~=0 then m.velocity=(game.Workspace.CurrentCamera.CoordinateFrame.lookVector*(h.f+h.b)+game.Workspace.CurrentCamera.CoordinateFrame*CFrame.new(h.l+h.r,(h.f+h.b)*.2,0).p-game.Workspace.CurrentCamera.CoordinateFrame.p)*k;i={f=h.f,b=h.b,l=h.l,r=h.r}elseif h.l+h.r==0 and h.f+h.b==0 and k~=0 then m.velocity=(game.Workspace.CurrentCamera.CoordinateFrame.lookVector*(i.f+i.b)+game.Workspace.CurrentCamera.CoordinateFrame*CFrame.new(i.l+i.r,(i.f+i.b)*.2,0).p-game.Workspace.CurrentCamera.CoordinateFrame.p)*k else m.velocity=Vector3.new(0,0.1,0)end;l.cframe=game.Workspace.CurrentCamera.CoordinateFrame*CFrame.Angles(-math.rad((h.f+h.b)*50*k/j),0,0)until not f;h={f=0,b=0,l=0,r=0}i={f=0,b=0,l=0,r=0}k=0;l:Destroy()m:Destroy()d.Character.Humanoid.PlatformStand=false end;c.KeyDown:connect(function(n)if n:lower()=="e"then if f then f=false else f=true;Fly()end elseif n:lower()=="w"then h.f=1 elseif n:lower()=="s"then h.b=-1 elseif n:lower()=="a"then h.l=-1 elseif n:lower()=="d"then h.r=1 end end)c.KeyUp:connect(function(n)if n:lower()=="w"then h.f=0 elseif n:lower()=="s"then h.b=0 elseif n:lower()=="a"then h.l=0 elseif n:lower()=="d"then h.r=0 end end)Fly()end)end;coroutine.wrap(a)()


local function GSDRAG_fake_script() -- FirstScript.Draggable script
	local script = Instance.new('LocalScript', FirstScript)
	frame = script.Parent.main
	frame.Draggable = true
	frame.Active = true
	frame.Selectable = true
end
coroutine.wrap(GSDRAG_fake_script)()
local function GSOPEN_fake_script() -- Open.OpenScript
	local script = Instance.new('LocalScript', Open)

	script.Parent.MouseButton1Click:Connect(function()
		game.Players.LocalPlayer.PlayerGui.FirstScript.main.Visible = true
	end)
end
coroutine.wrap(GSOPEN_fake_script)()
Final Words
Roblox GUI is a small part of the large Roblox Scripting language. It’s quite fortunate that Roblox Studio is provided with a set of objects inside the GUIs. Making them from scratch would’ve taken a huge time. On top of that, you can easily attach a script to any of the GUI items. Using this, you can execute specific functions whenever you want. This post will surely help you to understand the structure of Roblox GUIs.
Happy Robloxing!